Everyone loves a home with outdoor living space provided by a deck or patio. It adds value to your home, boosts aesthetics, and gives you a place to hang out with friends and family. Several options are available for installation, and choosing the right one will likely depend on what you want your deck to be used for. Regardless, deck installation can take a lot of work, but you can transform your outdoor space with little time and effort. To help, we’ll cover everything you need to know about deck installation.
What Factors Affect the Installation of a Deck
The first things to consider are the different factors that can affect your installation. Some types of decking materials may be easier to install, and you’ll need to take precautions to avoid complications along the way. Consider some of the following before you get started.
Available Space — deck size should be determined based on your available space and how much of your lawn you want the structure to cover.
Function — if you want to build your deck to host future events, you may want to create a different layout than if you were to use it to surround a pool.
Architectural Style — different materials complement different architectural styles, so you’ll want to consider the aesthetics of your home before getting started.
Land Grading — if you have different elevations in your yard, you may be required to level them out before building. Alternatively, you could build an elevated deck.
Utility Lines — you’ll need to contact your utility companies to get a map of utility lines running through your yard. Otherwise, you could be faced with dangerous and expensive mishaps.
How Much Does a Deck Installation Cost?
The cost of a new deck can depend on several factors, such as size, material, and installation type. Tackling the installation as a home improvement project can lower costs, but installation issues or mistakes may lead to costly repairs. If you don’t feel like you have the carpentry skills required, it may be better to leave the job up to the professionals. Materials and labor costs (on average) anywhere from $20 to $50 per square foot. For example, a deck with about 80 square feet can cost anywhere between $1,600 and $4,000, while a 400-square-foot deck can cost between $8,000 and $20,000. A deck calculator can help you better understand what to expect for your project.
How to Build a Deck
When you’re building a deck, it’s important to take your time and ensure that you work with precision. This is not a job to rush, so take your time and get help if needed.
Choose Your Deck Materials
The first step is considering your material options and choosing what you want to use. If you want something more traditional, you can use natural wood. A pressure-treated wood deck is typically made from pine and placed in a pressure chamber to help seal it for protection against the elements. Hardwood decks are made from Ipe, mahogany, and tigerwood and tend to be durable but are still susceptible to rot and decay. Sealing them can help, but they’re also prone to sun damage and warping. Softwood decks are typically made from cedar or redwood. However, they tend to be the least durable type of wood. Using a sealer, ensuring proper drainage, and applying a wood stain can help improve the deck’s resilience but will require ongoing maintenance.
Composite decking is another option that’s grown in popularity. It’s low-maintenance and comes in a variety of different styles. It’s made from a mixture of wood and recycled plastics, making it more durable over the years. Composite deck boards often come with hidden fasteners, which create a cleaner look.
Determine Your Substructure Plan
If you’re planning on building over or renovating an existing deck, make sure that you inspect it thoroughly to ensure it’s safe for use and will be strong enough. Rotten wood won’t work as a base and will likely require demolition before anything else. Never risk the structural integrity of a new deck—it’s not worth the time, energy, or money. If you build a new foundation, you’ll need to start from scratch.
Plan Out Sizing and Spacing
Once you know your materials and substructure, it’s time to start with planning. Choose where you want to install your deck and create a sitemap. Make sure to consider slope, soil, and drainage to avoid issues down the line. You should include the number of deck posts or footings and joint spacing to ensure things are in order before getting started.
Obtain a Building Permit
Depending on the local building code in your area, you may need to secure a building permit before getting started. Make sure to triple-check this before purchasing any materials or getting started, as building without a permit can result in staggering fines, and you may need to demolish any unapproved work.
Lay Out the Foundation and Dig Post Holes
Once you have your plan, it’s time to lay the foundation for your deck. Use stakes and string to mark the perimeter of the deck and determine the locations for your support posts. Carefully dig post holes at the designated spots, ensuring they are deep enough to provide proper support for your deck structure. Before moving on to the next step, make sure the alignment and measurements are accurate. If you find they’re off, fixing them before moving on is important.
Pour Concrete
With the post holes ready, it’s time to pour concrete into each hole to create a stable foundation for your deck. Place the support posts in the center of each hole and fill the surrounding space with concrete. Use a level to ensure that the posts are straight and properly aligned. Allow the concrete to cure fully before moving on to the next steps to make sure you have a solid foundation for the rest of the build.
Build the Deck Frame
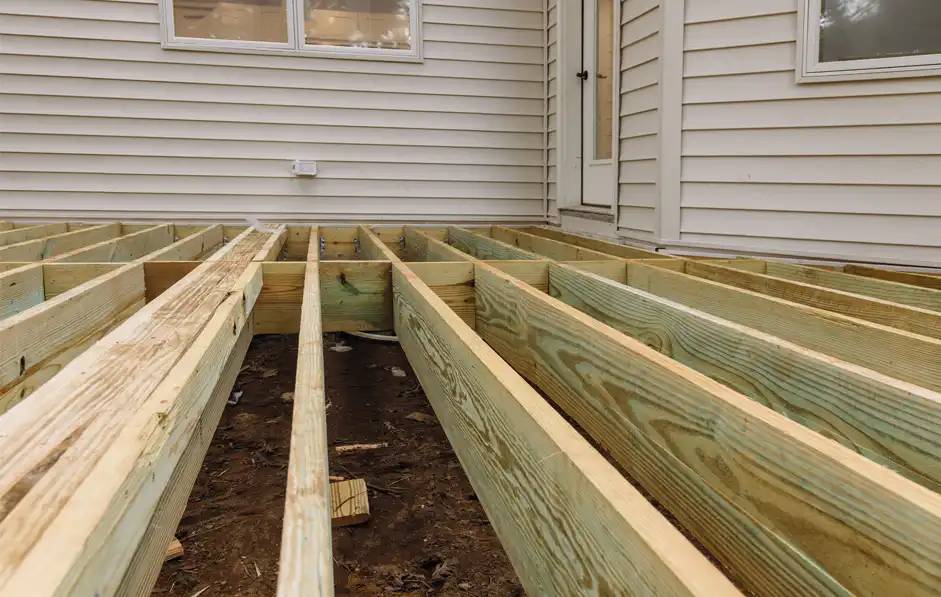
Once the concrete has cured, it’s time to build the frame of your deck. Install ledger boards along the exterior of your house, and make sure they’re securely attached and level along the way. Then, connect the support posts to the ledger boards and add additional beams to create a sturdy frame. The deck frame will serve as the skeleton for the rest of your deck structure, so take your time and be sure to use the necessary tools to check for accuracy.
Attach Posts, Rim Joists, and Angle Brackets
Next, you’ll need to place and secure the deck joists onto the frame. Position the joists perpendicular to the ledger board, ensuring that they are evenly spaced according to the manufacturer’s recommended joist spacing. Attach the joists to the ledger board using appropriate joist hangers and screws to provide additional structural support.
Then, double-check the levelness and alignment of each joist to guarantee a stable and even deck surface. Don’t move on until the joists are properly secured. Once the joists are in place, you have a solid foundation for proceeding to the next step of deck building.
Install Deck Boards
With all of the supportive structures in place, it’s time to install the deck boards. Begin at one end and work your way across, securing each board with appropriate fasteners. Ensure consistent spacing between boards for both aesthetics and proper drainage. You can also use hidden fasteners for a cleaner, more polished look. You can also install a railing if you want to add aesthetic features to your deck.
Stain and Protect
Finally, protect your finished product from the elements by using a deck stain or sealer. If you install composite decking, you can skip this step as the materials are already treated.
Getting Some Help with Your Deck Project
Regardless of what type of deck you want, making it a DIY project can be a bit stressful… and expensive. Installing a deck requires a lot of planning, patience, and attention to detail. While it is possible to DIY the build, if you’d rather leave it to the professionals, that’s okay, too. The team at First Star Exteriors can help with every step of your build. From planning your deck, choosing the materials, and constructing a durable substructure and deck, our team is committed to providing you with the best results possible. We offer ground-level deck installation, elevated decks, and more. To learn about our deck installation services, contact a member of our team today or schedule a free estimate today.


